This guide makes music theory for kids simple and fun. Inside you’ll find 9 lessons that cover the basics of pitch, rhythm, the musical alphabet, clefs, and more—each explained in a way children can enjoy and understand.
Every song your child loves is built from two simple building blocks: pitch (how high or low a sound is) and rhythm (how long or short sounds last). Starting here makes learning music theory for kids feel natural, playful, and confidence-boosting.
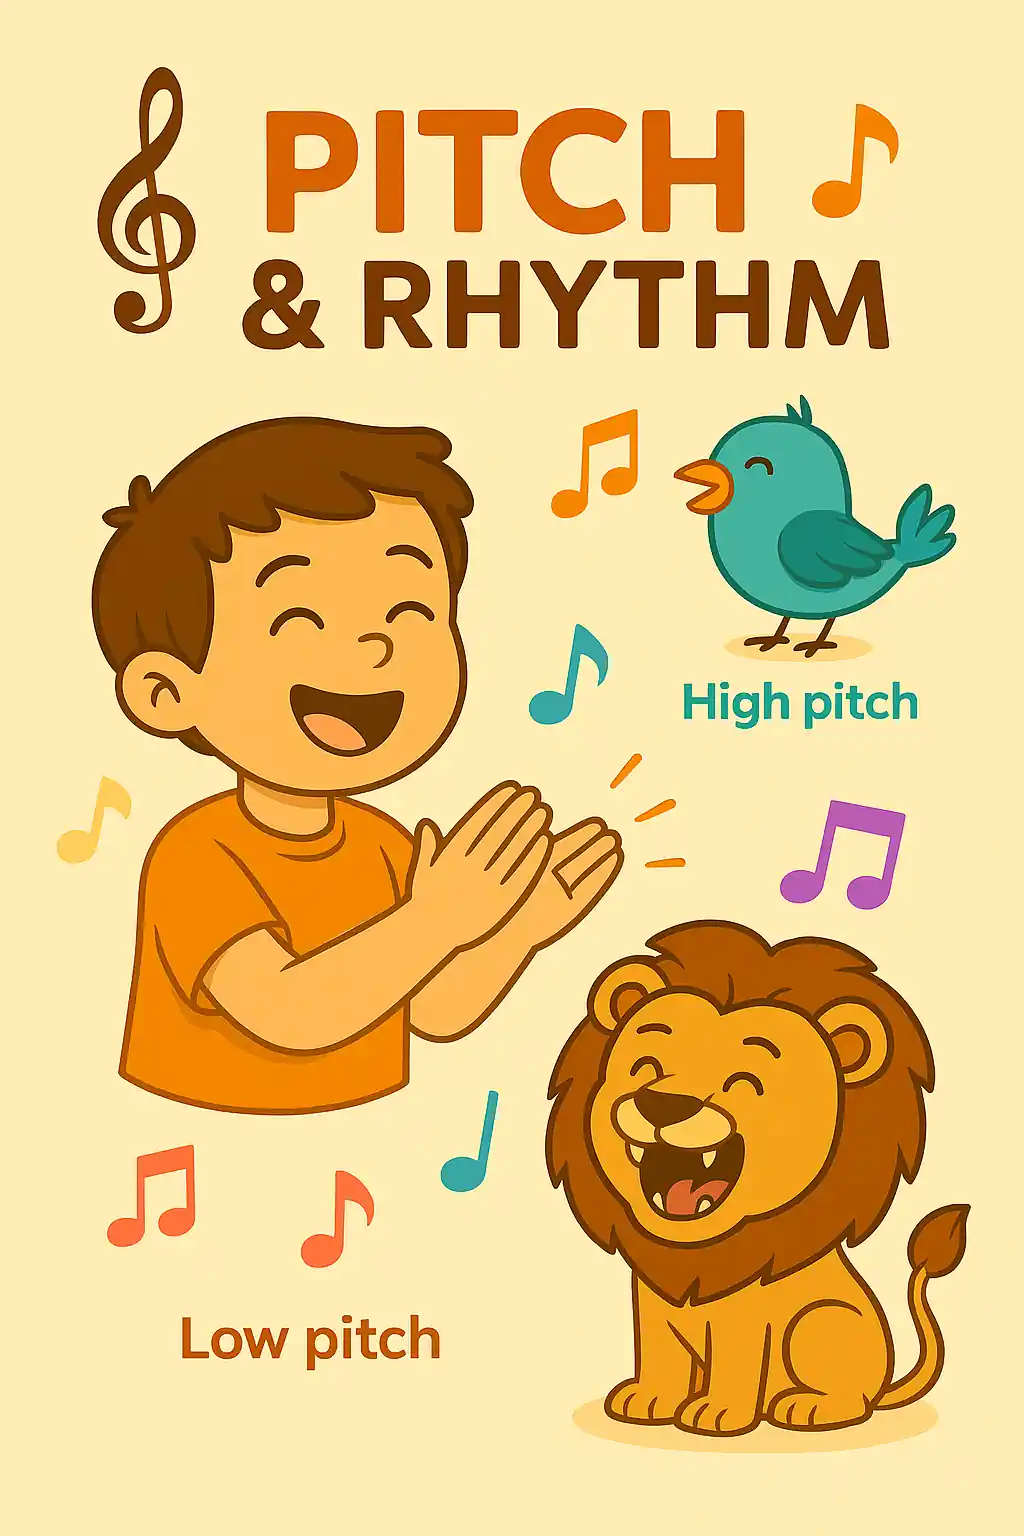
Describes how high or low a sound is.
Bird tweet vs. lion roar — kids hear it instantly.
Try a quick game: hum a high note, then a low note, and let your child guess.
Tip: Switch roles so your child “tests” you—instant engagement.
The time of music—beats, lengths, and patterns.
Clap a steady “heartbeat” (4 even claps), then try quicker claps for fast notes.
Use body movement: tapping toes, marching, or gentle bouncing to feel the beat.
Household instruments (pots, spoons, snaps) make rhythm practice fun and memorable.
Why start here? Pitch + rhythm = melody. Simple songs like “Twinkle, Twinkle” are easy examples: notes rise and fall (pitch) while the beat stays steady (rhythm). Mastering this pairing makes future topics—like the musical alphabet, treble clef, and counting notes—click much faster.
Make three sounds in a row: high & short • low & long • high & long.
Ask your child to identify pitch (high/low) and duration (short/long).
Swap roles and let your child be the “composer.”
Variation: Say “low and slow” vs. “high and fast” while clapping to pair language with listening.
Pitch = high/low; Rhythm = timing. Together, they build melodies.
Short daily play (5–10 minutes) beats long sessions for beginners.
Use movement and simple games to keep learning joyful and sticky.
Up next, your child will discover the musical alphabet (A–G) and why the same letter can sound higher or lower at different places—an exciting stepping stone on this journey.
One of the first steps in music theory for kids is learning the musical alphabet. Unlike the 26-letter English alphabet, the musical alphabet only has seven letters: A, B, C, D, E, F, G. After G, it loops back to A, creating a simple cycle kids can quickly memorize. This repetition is at the heart of music theory for kids, helping them recognize patterns on instruments and in written notes.
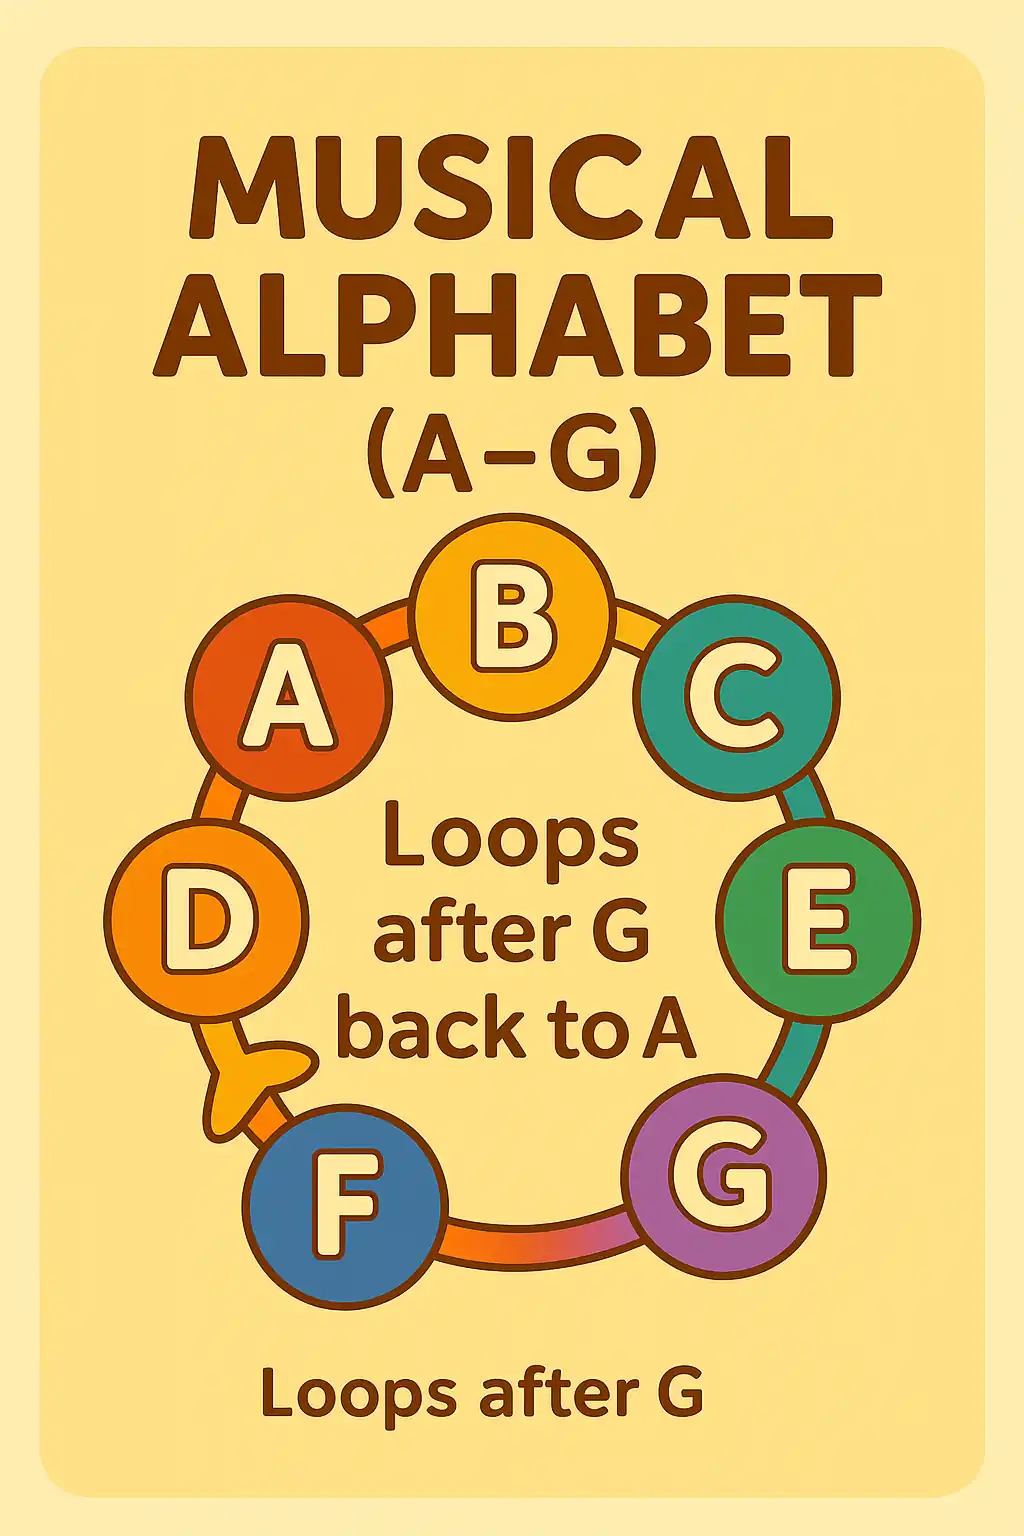
Same seven letters everywhere: In music theory for kids, the letters A–G are reused across the full range of sound. That’s why a note called “C” can show up high, middle, or low—its name stays the same while the pitch changes.
Octaves = higher or lower twins: When you reach G and go up, you land on A again—an octave higher. The cycle keeps notes organized so children don’t need dozens of new letter names.
Works on every instrument: Guitars, pianos, violins, and voices all use the same A–G loop. This consistency helps kids move between instruments without relearning the alphabet.
Helps with reading later: Because letters repeat, the staff can show the location of each A–G. Kids first learn the cycle, then place each letter on treble and bass clefs in later lessons.
Builds pattern recognition: Seeing the loop (A→G→A) trains children to notice repeating shapes and sounds, which speeds up learning songs and scales.
Seven-letter cycle: The musical alphabet is A–G, then it repeats. After G comes A again.
Same name, different heights: A note called “C” can sound higher or lower depending on where it’s played or sung.
Octave connections: Two notes with the same letter an octave apart feel like “twins”—same identity, different height.
Instrument-friendly: The A–G loop is universal, so practicing on piano, guitar, or voice uses the same letters.
Reading ready: Learning the loop first makes it easier to find letters on the treble staff and bass staff later.
Say it forward & backward: Kids should be able to recite A→G and G→A smoothly—this helps with both pitch and reading speed.
Mastering the A–G loop now makes future lessons—clefs, notes on the staff, and scales—click much faster.
Next, we’ll connect the musical alphabet to written notes on the treble and bass clefs—one of the most exciting steps in music theory for kids.
In music theory for kids, clefs act like maps for reading. The treble clef guides higher notes and the bass clef guides lower notes—so children instantly know where sounds “live” on the staff.
Often played by the right hand (piano), higher-pitched instruments & voices.
Line notes: E-G-B-D-F → “Every green bus drives fast.”
Space notes: F-A-C-E → “FACE.” loop. This consistency helps kids move between instruments without relearning the alphabet.
Originally called the G-clef (the swirl targets the G line).
Often played by the left hand (piano), lower-pitched instruments & voices.
Line notes: G-B-D-F-A → “Good, burgers, dessert, fries, always.”
Space notes: A-C-E-G → “All cows eat grass.”
Also called the F-clef (the dots surround the F line).
Find G fast
Find F fast
Right ↗ Treble • Left ↙ Bass
It tells you which line/space equals which letter note so reading becomes consistent and quick.
Music spans low→high pitches. Two clefs let us place low notes comfortably on bass and high notes on treble without tons of ledger lines.
Answers: Treble • Bass • Left hand
With treble and bass clef basics in place, your child is ready to start how to read music for children on each staff. Next, we’ll focus on reading the treble staff—turning letters into real notes on the page.
The treble staff has five lines and four spaces. Each line and space represents a note. Kids can remember them with simple phrases and visual patterns. This makes music theory for kids easier to grasp and more memorable.
Draw five short lines on paper. Have your child write EGBDF on the lines and FACE in the spaces. Color-coding each letter makes recall much faster.
Clap each letter as you say it—slow at first, then faster. Kids love the rhythm connection, and it reinforces pitch + beat together.
Once treble staff notes feel comfortable, moving to the bass staff will be smoother. Next, we’ll explore how to read lower notes and connect them with treble for a full picture.
In music theory for kids, landmarks make reading fast. The bass clef is also called the F-clef because its two dots surround the F line. Have your child point to the F line first on every new example—then “step” up or down to find nearby notes.
Step from F: Up one line → A space; down one space → E.
Say and trace: “F… up to G… up to A” while moving a finger along the staff.
Mix it: Start on F, jump two steps up or down, and name where you land.
Secondary support: bass clef for beginners, how to read music for children.
Slow chant: Say A–C–E–G and G–B–D–F–A in a calm rhythm.
Finger track: Trace lines/spaces as you speak—pair touch + sound.
Reverse run: Go top→bottom sometimes to test true understanding.
Show low C, E, and the F landmark on your instrument. Tap each key, then point to its note on the bass staff. Kids connect “lower on keyboard ≈ lower on page,” which cements how to read music for children across instruments.
Great—your child now has two reading maps: treble for higher notes and bass for lower. Next, we’ll add accidentals (sharps, flats, naturals) so those maps can shift by a half step when needed.
In music theory for kids, accidentals are special symbols that change a note’s pitch. They help children understand how the musical alphabet can shift up or down by small steps, making songs sound brighter or darker.
Raises the note one half step (move to the right on keyboard or up on a fretboard).
Lowers the note one half step (move to the left on keyboard or down on a fretboard).
Cancels a sharp or flat and returns the note to its original pitch.
Half-step ladder: In music theory for kids, a half step means moving to the very next key or fret without skipping. For example, C → C♯ is up one half step, and E → F is also a half step even though both notes are white keys.
Say “up a half step” while pointing to the next key. This simple routine keeps music theory for kids clear and practical.
Saying “down a half step” as you point reinforces movement and sound—core skills in music theory for kids.
E♯ is the same key as F in many contexts, but on a keyboard there’s no black key between E and F—so moving up from E lands on F. Similarly, B down a half step is B♭, while B up a half step is C. These examples show how accidentals are applied in music theory for kids.
Sharps and flats describe movement by half steps, not color. E → F and B → C are both half-step moves to white keys, which surprises many beginners in music theory for kids.
With accidentals mastered, rhythms become the next superpower—helping children in music theory for kids understand how long each note lasts and how to read and clap with confidence.
Every note has a length, or value. In music theory for kids, rhythm is often easiest to learn by comparing note values side by side. This table makes the differences clear at a glance.
|
Note
|
Beats
|
How it feels
|
Clap example
|
|---|---|---|---|
|
Whole Note
|
4 beats
|
Long and steady
|
👏 — — —
|
|
Dotted Half
|
3 beats
|
Almost whole, but shorter
|
👏 — —
|
|
Half Note
|
2 beats
|
Balanced, medium length
|
👏 —
|
|
Quarter Note
|
1 beat
|
Steady walking pace
|
👏
|
|
Eighth Notes
|
½ beat each
|
Quick steps
|
👏👏 (“ONE-and”)
|
|
Rests
|
Match note values
|
Silence in rhythm
|
🤫 (quiet count)
|
Rhythm values make sense once kids feel the beat. Next, we’ll explore rests—silent notes that bring space and breathing into the music.
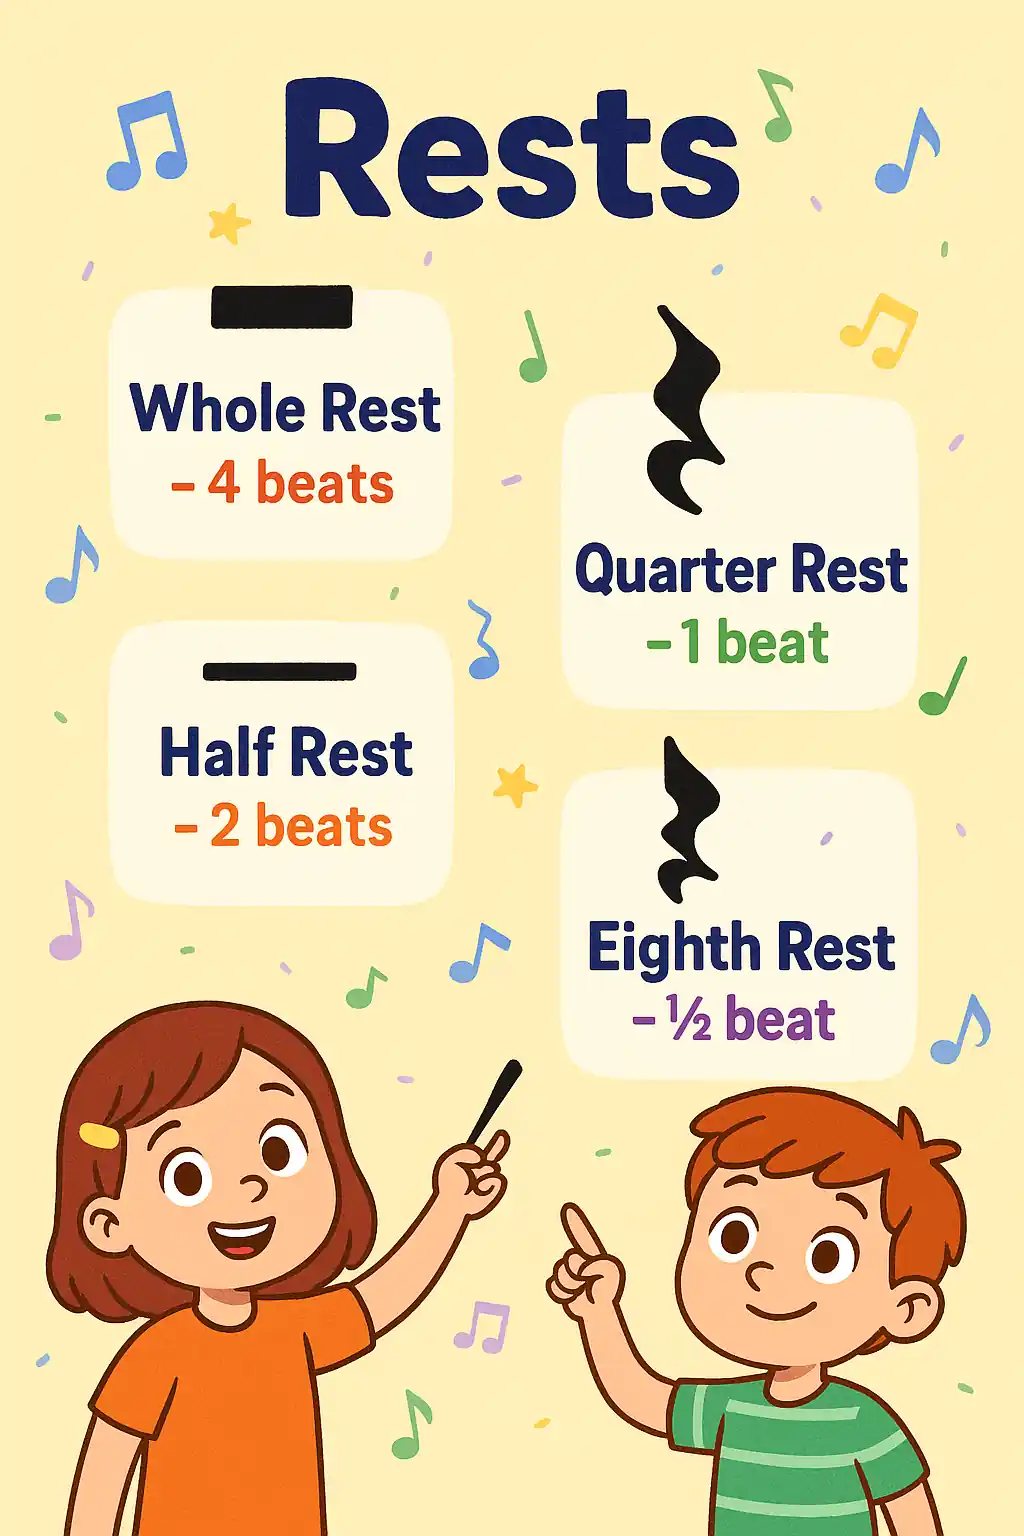
Music isn’t just about sound—it’s also about silence. In music theory for kids, rests teach children when not to play or sing. This balance between notes and silence makes rhythms feel natural and musical.
Breathing room: Rests give space between sounds.
Clarity: They prevent music from sounding crowded.
Expression: Silence adds drama and emotion.
Think of rests like punctuation in reading—commas, periods, and pauses help the story flow.
Whole rest: 4 beats of silence
Half rest: 2 beats of silence
Quarter rest: 1 beat of silence
Eighth rest: ½ beat of silence
Each rest matches the length of its note twin—it’s just quiet instead of sound.
Clap this pattern:  (quarter) (quarter)
  (quarter rest) (quarter). Hear how the silence becomes part of the rhythm? Kids often smile when they realize silence “counts” too.
With both notes and rests in hand, your child can shape rhythms that breathe. Up next, we’ll look at measures & time signatures—the way beats are grouped into patterns.
Measures and time signatures show how beats are organized so music stays balanced and easy to count. When kids grasp this, strumming patterns for easy guitar songs for kids to learn feel natural.
4/4 = four beats, quarter gets the beat
3/4 = three beats, waltz feel
2/4 = two beats, march feel
A measure is a “box” of beats marked off by bar lines. Each box holds the same number of beats, so counting resets at 1 each time. Picture rows on a calendar—equal spaces that keep everything tidy. This tidy grouping helps children play easy guitar songs for kids to learn with steady timing.
Top number = how many beats are in each measure.
Bottom number = which note equals 1 beat (in 4/4, the quarter note).
Most beginner pieces use 4/4 because “1-2-3-4” is simple to feel and count.
4/4 Feel — steady pop groove
Say: “1-2-3-4 | 1-2-3-4 …” Then down-strum once per number.
3/4 Feel — waltz sway
Say: “1-2-3 | 1-2-3 …” Emphasize beat 1 slightly.
2/4 Feel — march snap
Say: “1-2 | 1-2 …” Think “left-right.”
Once counting feels natural, plug these loops into easy guitar songs for kids to learn that match each feel.
Great work! With measures and time signatures locked in, your child can keep time confidently—perfect for easy guitar songs for kids to learn at home or in lessons. The full video lesson adds guided play-along practice.
Rhythm is the heartbeat of music. Before children dive into songs on piano, guitar, ukulele, or even singing, they need to feel and understand steady beats. By learning note values and duration, kids begin to recognize how timing shapes every melody and chord. This early grasp of rhythm makes practice more enjoyable and ensures that when they start playing songs, the music feels natural, flowing, and fun.
Rhythm is the heartbeat of music. Before children dive into songs on piano, guitar, ukulele, or even singing, they need to feel and understand steady beats. By learning note values and duration, kids begin to recognize how timing shapes every melody and chord. This early grasp of rhythm makes practice more enjoyable and ensures that when they start playing songs, the music feels natural, flowing, and fun.
One of the core foundations of music is learning to read notes. Without this skill, playing songs on piano, guitar, ukulele, or even singing becomes much harder. In these fun animated lessons, kids explore the treble clef and bass clef, practice line and space notes, and discover how written music connects to the sounds they hear. Once they can recognize notes on a staff, they are ready to bring melodies to life in beginner keyboard lessons and beyond. Check out the video sample on the left to see how engaging and simple it can be for your child to learn the treble clef notes.
It’s how music works—pitch, rhythm, alphabet (A–G), clefs, notes, rests, and time signatures—explained in a kid-friendly way with games and mini-exercises. Parents and teachers often use musictheory.net for extra practice.
Ages 6–12 is a sweet spot. Younger kids love clapping & movement games; older kids can read treble/bass. Groups like NAfME encourage rhythm play in early grades.
Nope! Start with clapping, singing, and flashcards. Instruments deepen the connection later—check out piano lessons for kids or guitar lessons for kids when ready.
Keep it short & focused: 10–15 minutes. Frequent mini-sessions build memory best. See this quick read on practice habits: 10-minute rule.
Sharps (♯) raise a note a half step, flats (♭) lower it, and naturals (♮) cancel either. A friendly intro is in Yamaha’s piano guide.
Use clapping games, movement, mnemonics, and quick quizzes. Sites like Making Music Fun have printable games, and JamGuitar lessons add playful drills you can do at home.
Yes! These nine lessons work as a tidy unit for a semester. Parents often add notation charts and flashcards for extra review.
From music lessons to drawing and chess, JamGuitar makes learning fun and engaging for kids.